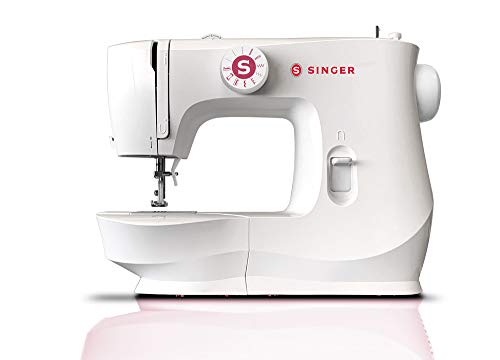
My Singer M1500 Review (Compared to 1304 & MX60)
This post may contain affiliate links, which means I’ll receive a commission if you purchase through my links, at no extra cost to you. I sometimes receive free products for review. Please read disclosure for more information.
A few years ago, Singer announced the arrival of the Singer M1500 sewing machine–their updated version of the well-loved Singer Start 1304 sewing machine.
While it’s not a bad machine, the Singer M1500 sewing machine isn’t packed with features, and it’s not for everyone.
Instead, it is a basic sewing companion intended for three groups: children learning to sew who may be confused by the basics, beginners who don’t want an expensive starter machine, and more experienced sewists looking for portability or a backup machine.
The machine has many plastic parts (even though there is an interior metal frame), and it won’t last forever. But, the stitch quality is at least decent for a machine at this price.
Check out my Singer M1500 review!

Quick Feature Overview
| Feature | Specs |
|---|---|
| Dimensions | 13 x 7 x 11.5 in |
| Weight | 10 lbs |
| Stitches | 6 types |
| Presser Feet | 3 |
| Buttonholes | 4 step |
| Bobbin size | Class 15 |
You Only Get 3 Presser Feet
Presser feet hold your fabric down as you sew. The presser feet of the Singer M1500 snap off from the presser foot holder and are easily swapped.

There are three presser feet included.
- All-purpose, zigzag foot: Use this for all the stitches except the buttonhole stitch or when attaching a zipper.
- Zipper foot: Use this foot when putting in a zipper.
- Buttonhole foot: Use this when sewing a buttonhole.
There is no button sewing foot, which holds buttons in place for attachment, and there’s no blind hem foot either for assisting with adding an invisible hem. I recommend purchasing a few more generic low-shank presser feet to expand what you can do with your machine.
Also, the presser foot holder is PLASTIC. This will not last as long as a machine that has a metal presser foot holder.
There Are Only 6 Stitch Types
While there are 57 “stitch applications,” there are really only 6 different stitch types: straight, zigzag, satin, blind hem, scallop, and buttonhole.
The straight stitch has three different lengths. The zigzag has two different lengths, and there’s also one triple zigzag stitch.

Since everything is preset, meaning no way to manually adjust stitch length or width, above are the stitches sewn by my 7-year-old daughter.
- Stitches 1-3 are straight stitches.
- The closest you’ll get to a satin stitch is the 4th stitch.
- Stitches 5 and 6 are the zigzag stitches, and stitch 7 is the triple zigzag. The triple zigzag stitch works well for stretch fabrics like knits and sewing in elastics.
- Stitch 8 is a blind hem stitch (although the machine doesn’t come with a blind hem foot?!), and stitch 9 is a scallop stitch to add decoration to your projects.
- The last stitch is the buttonhole, which is produced in 4 steps.
I just don’t love that you can’t adjust the stitch length or width, as there’s only that one stitch knob of selections. For example, you don’t have that option for a very narrow zigzag stitch to use for sewing knits, nor do you have a dense satin stitch for outlining applique.
Sewing with the Singer M1500 Takes Some Time to Learn
When you first start to stitch, the reverse lever on the machine front does a backstitch to secure the beginning of your project. I prefer reverse levers that are located right over the sewing workspace, but the lever on the M1500 is on the front right of the machine.
And, because the Singer M1500 is a mechanical sewing machine, you have to use the foot controller to get started sewing.
For a beginner or a child, this takes a little bit of time to learn how to use–it’s kind of like learning how to use a car’s gas pedal. It’s also pretty lightweight and can slide around a bit.
Making Buttonholes in 4 Steps Isn’t Super Fun

I prefer 1-step buttonholes over the 4-step buttonhole creation on the Singer M1500. Here’s what 4-step means for creating a buttonhole:
- You have to determine the size of the buttonhole you want as well as the location and then mark it on your fabric.
- You then have to make the buttonhole yourself in four different steps. On the dial above, you’ll see the buttonhole stitches. You have to stitch 1, then turn the dial to 2, then turn it to 3, and then turn it back to 4 (the same as 2.)
Once you get the hang of creating a buttonhole, it’s not that hard. I just don’t think it’s as beginner-friendly as a one-step automatic buttonhole, and I have to help my daughter with it.
In contrast, with a one-step buttonhole, you simply place your button on the back of the included presser foot, press a buttonhole stitch, and voila! The machine sizes the buttonhole and stitches accordingly with no input from you.
Built-in Free Arm
If you remove the small accessories compartment at the front of the sewing machine, you have what is called a free arm left.
This essentially makes the workspace a little smaller so you can wrap small, circular items around it. I use the free arms a ton on my sewing machines when I’m hemming jeans or making doll clothes (or toddler clothes, for that matter!)
LED Light
The workspace itself is illuminated by a small LED light when the sewing machine is turned on.
While it’s not the brightest light, it does provide some help with seeing dark stitches on dark fabric or giving you a little more light to thread the needle. If you need even more light, luckily there are several options for sewing lights to purchase as an accessory.
Don’t Sew Thick Fabrics with the Singer M1500
The Singer M1500 is NOT a heavy-duty sewing machine, so don’t expect it to go into beast mode when you sew denim or canvas. It does have an extra high presser foot lift to accommodate thicker fabrics, but again, this is NOT its intended use.
In fact, per Singer, the Singer M1500 is only recommended for basic mending and light- or medium-weight fabrics.
Now, if you want to occasionally mend jeans, go for it. BUT, make sure you’ve chosen the right needle and thread, and use the handwheel over the seams so you don’t break your needle.
If your sole purpose in purchasing this sewing machine is to sew on multiple layers of thick fabric (even bulky quilts), I recommend a heavy-duty sewing machine instead. I love my Singer 4423 heavy-duty sewing machine.
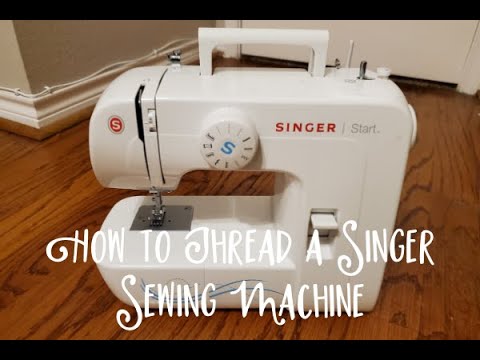
Threading the Singer M1500 and Setting Up To Start
I made a YouTube video for how to thread the Singer 1304, and this is going to be the same way you thread the Singer M1500. I’m a better blogger than a video gal, but I thought having a video and post for how to thread a Singer sewing machine were important for beginners to see!
Winding the Bobbin and Threading the Needle

Your sewing machine bobbin is a circular plastic piece that holds the thread needed to form the bottom of your stitches. Winding the bobbin happens on the top of the machine. This is easy to set up thanks to the directions stamped on the top of the machine.
Threading the sewing machine needle itself is also very easy. Follow the directions on the machine, or you can use the included quick-start guide.
One thing to note is there is no automatic needle threader with the Singer M1500. As such, you will have to pull the thread through the eye of the needle by hand.
If you want an automatic needle threader, the simplest Singer sewing machine that includes this feature is the Singer M3300. Honestly, all my other machines have needle threaders, and they’re not as great as they sound. They are difficult to get the hang of at first and can be sensitive. So it’s not the end of the world if you don’t have one.
Installing the Bobbin and Pulling the Thread Up
Bobbin installation on the Singer M1500 is the biggest con of this sewing machine. The Singer M1500 features what is called a front-load bobbin. Below is the bobbin case, which holds the threaded bobbin.

Removing the case is easy, but installing the bobbin takes time to learn. You have to remember which orientation to keep the case relative to the bobbin thread, and you need to know how to get the case back in snugly. There are no imprinted instructions on the machine for this, which is a huge bummer.
I’m not a huge fan of having to draw up the bobbin thread before starting to sew, but I’ve been spoiled by my snazzy machines. My daughter doesn’t know any difference, so it doesn’t bother her at all!
Drawing up the bobbin thread means doing one stitch (using the handwheel) to get the thread from the bobbin case to come up through the footplate. If you purchase a machine with a “quick-set” bobbin, like many Brother sewing machines, this step is eliminated for you; the machine draws up the thread when starting to sew.
Now, even though I spent time telling you why I’m not a fan of the front-load bobbin, this doesn’t mean this is a dealbreaker for the machine–because spools of thread and bobbin threads last a fairly long time!
As such, you won’t have to thread your machine or install a bobbin but every once in a while.
The Singer Warranty
Nothing in life is guaranteed, and every once in a while you’ll get a dud sewing machine. If this is the case, you can take advantage of the Singer warranty.
This is a 25/2/90 warranty. You can read more in the warranty document at Singer. Basically, everything is covered for 90 days with free labor, a lot of stuff is covered for 2 years but with labor paid by you, and only the machine head is covered for 25 years.
And, if you aren’t impressed by this warranty, it’s fairly comparable to many other sewing machine manufacturer warranties.
Beginner M1500 Troubleshooting Tips
With any sewing machine, if you’re having issues, it might be beginner user error rather than the machine itself. I can’t tell you how many times I’ve done silly things and have ended up cursing my sewing machine but ultimately realized I was at fault.
Thus, if you’re having issues with stitching, the bobbin jamming, etc., here are some steps to take.
- Rethread the machine making sure the presser foot is UP while doing so.
- Rethread the bobbin and verify you have inserted it in the correct direction. If you don’t hear a little snap when you insert the bobbin and it is loose, this will cause your machine to jam.
- Make sure you are sewing with the presser foot down every time!
- Adjust the tension using the dial along the front of the machine above the workspace. (I have a post about how to adjust sewing machine tension for beginners!)
- Check to make sure the needle is not bent and is installed properly. If you’re using an old needle, go ahead and replace it.
- Make sure your needle size and type correspond with your fabric. This means using a ballpoint needle for knits, a heavyweight needle for denim, and a sharp or universal needle for cotton, for instance.
- If your thread is old or poor quality, consider trying a different thread spool.
If you’ve tried all these things and are still having problems, it may be time to take your machine to the shop.
Pros
- The simplest full-size sewing machine you can purchase
- An affordable, portable, small sewing machine
- Free-arm and twin-needle capability are nice perks for an entry-level machine.
Cons
- Front-load bobbin and having to draw the thread up yourself before starting to sew are not beginner-friendly.
- The 4-step buttonhole is more difficult to learn.
- Preset stitch length and widths make certain projects more difficult.
- There’s no automatic needle threader.
- More plastic parts than other more expensive machines.
Singer M1500 vs. Singer 1304

The M1500 is sleeker but still features the same 10 preset stitches and one automatic buttonhole, and it boasts a similar operation. Essentially, everything is identical except for the new, updated look, so most things you read about the Start 1304 will translate to the M1500.
Check out my Singer Start 1304 review for a ton of information and pictures of my daughter’s machine.
Singer M1500 vs. Singer MX60
The Singer M1500 and the Singer MX60 are the exact same sewing machines in terms of use and features. I contacted Singer and was advised the only difference between the two machines was cosmetic and simply different colors on the stitch selection dials.
Singer M1500 vs. Brother XM2701
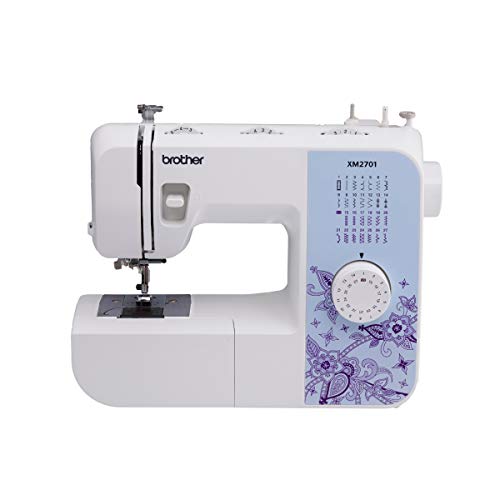
Instead of 6 stitches and a 4-step buttonhole, the Brother XM2701 features 27 stitches and an automatic one-step buttonhole. It also includes an automatic needle threader and offers the user the ability to change stitch length and width.
If you feel the Brother XM2701 may be a better fit, my Brother XM2701 review will teach you more about it! The Brother XM2701 sewing machine offers more for the money than the Singer M1500.
In conclusion: The Singer M1500 is suitable for performing simple tasks and is a good addition to a beginner’s or child’s sewing room. It’s not much different than its well-loved predecessor, the Singer Start 1304, and is known for its simplicity, affordability, and good stitch quality. However, plastic parts and the lack of more advanced features don’t make it a good primary sewing machine for intermediate or advanced sewers.
Thanks for all the detailed information about M1500, it is very useful for a beginner like me. I need a sewing machine for alterations and hemming and doing small jobs like may be stitching clothes for babies. I am hoping i can stitch baby blankets or bibs for my future grand kids. I have 2 young newly married daughters😀I am a crochet person, not too much into sewing, I know basic sewing as I had done small projects while in school which was almost 35 years ago. Is it a good machine for tasks like these or do you recommend something better than this one. I dont want to spend too much on it. My budget was under $200. Any suggestions would be really appreciated. Thanks so much….
Hi! Congrats on your daughters’ marriages! The M1500 is a very basic sewing machine, but it will allow you to do alterations and hemming as well as sewing blankets and bibs. We’ve had good luck so far with the M1500’s predecessor (the Singer 1304) accomplishing all simple sewing tasks for my daughter. So yes, I think this machine should do what you want it to!
That being said, if you do want a little more advanced sewing machine to allow for future growth should you decide you really like sewing, the Brother XM2701 offers a little more. It has features like a built-in needle threader, adjustable stitch length and width, more stitch options, and a one-step buttonhole. Those are nice features to have but are by no means necessary for users who just want do simple sewing tasks!
Thank you so much for all this useful information. Amazon has another machine (listed as Singer MX60) that sounds exactly like the M1500. I can’t seem to find too much info about the MX60. Would you happen to know if it is the same as M1500, maybe a special edition or something?
Thanks again.
It does sound exactly like the Singer M1500! I was able to also find the Singer MX60 on the Australia Amazon page, so it is possible it was made as an international version of the M1500 but is now available in the US and other locations as well during COVID. That would be my best guess, but I’ve not heard of it until you mentioned it.
Thank you so much for such a detailed review! I bought a Singer M1500 and have just started to sew. I was wondering what foot you would use with a twin needle?
The zigzag (all-purpose foot) should do the trick! Be careful what stitch you select, though, and manually make sure the needle does not hit the presser foot before starting to sew. (Basically, just advance the needle with the handwheel on the right side of the machine to test before using the foot pedal to speed up.)
Thank you very much this helped me a lot as I was confused to get M1500 or Mx60 from Amazon. it is on the way so hopefully it is good for a beginner like me who needs it for adjusting the length of the pants and minor stuff!